The WordPress plugin I am using for my photo gallery is called WP Show Posts. And it is mainly used to display a selection of posts anywhere on a WordPress website. WP Show Posts is one of my default plugins I use on all of my sites.
For your information: I am using the paid version of the WP Show Posts plugin. It is not possible to create this photo gallery using the free version of WP Show Posts, please keep that in mind. I am in no way affiliated with WP Show Posts and do not profit from any purchase you may make.
The photo gallery or portfolio is quite possibly the most important part of a photography website. The way I created my photo gallery most likely differs from what you might have read or seen in other guides. I am not using a tailor-made photo gallery plugin to accomplish my goal. I only ever use WordPress plugins I can trust. And WP Show Posts, which was created by the same person who brought us GeneratePress, is one of my most trusted plugins.
Installing the WP Show Posts and Pods
For this guide, you will first want to install two plugins. And after you have installed the free version of WP Show Posts you can purchase and download the Pro version and install it manually.
Creating the Pods
Using the Pods plugin we are going to create a Custom Post Type. You could, in theory also skip this step and installing the Pods plugin for that matter. If you are only going to be using the site for photos you could just use Posts and wouldn’t have to bother with Custom Post Types. But the Pods do give you a better structure. Also, if you were to add a blog to your site later on you’d still be able to do that without any problems.
Enabling photo categories
You’ll find the option to enable photo categories once you’ve created the appropriate taxonomy. See the next step on how to do that. In the screenshots below you can see the configuration of my Photos pod:


Creating taxonomies
You will almost certainly want to categorize our photos into different photo galleries. For that, you need to create a new taxonomy. This taxonomy can be used to categorize your photos as landscapes or portraits etc. I have simply named my taxonomy photo categories. Other than that you don’t have to adjust any settings.
Once you have created your pod and taxonomy you will notice that in the left-hand WordPress menu there will now an option called Photos. It should have the same little icon as your posts. If you click on it, you will see an option labelled photo categories.
Before adding any photo I suggest you click on the option and create appropriate categories for the photos you want to showcase on your WordPress website. Each category will be turned in to an individual photo gallery. For me, the categories will be mainly related to nature photography and landscapes.

Adding photos
And finally, you can start adding your photos to the pod. Each photo will have to be uploaded individually and the photo itself is just the featured image, which you can upload. Make sure you select the categories you want each photo to appear in on the right. With that, the photo is ready and you can move on to the next one. A photo can, of course, be in more than just a single category.

A plugin for better organisation
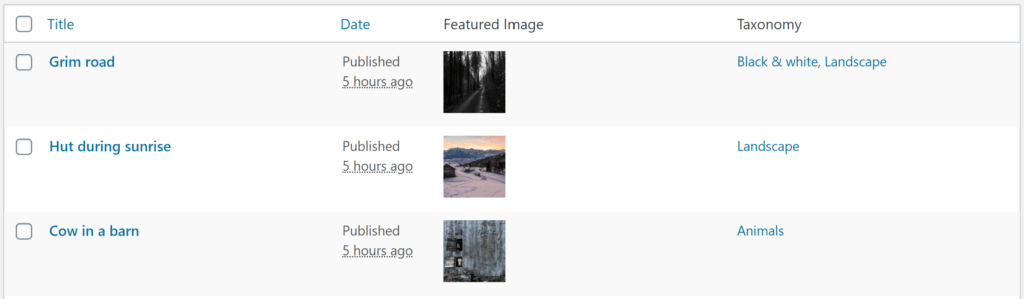
Only once I had all my photos uploaded I realized that the overview of the photo pod is pretty bare-bones as can be seen in the screenshot.
How am I supposed to know which photo is behind each title? But fear not, for there is another free WordPress plugin that can help us out.
The WordPress plugin I’m talking about goes by the name Admin Columns. Once installed you can go into the settings and select Photos from the dropdown. Here you can enable the featured image and taxonomy.

And with that, the overview is much more useful. The photo itself (which is the featured image) and the taxonomies are displayed instead of just the title.
Creating galleries in WP Show Posts
Now that you’ve got your photos uploaded, you can finally start creating your photo galleries. To accomplish that, simply click on WP Show Posts in the WordPress menu and add a new list. Here you can give your list a fitting name, such as Gallery landscape (I put the gallery first so that all photo galleries get grouped together if I sort alphabetically, it’s something you learn to do when working in IT).
As this WP Show Posts list will be a photo gallery and not a list of posts, you don’t want it to display anything other than the photos you have uploaded to your pod. To do that select photo under post type select photo and under taxonomy select photo category.
You can then select which categories you want to display. In this case, I’m going with my nature photos. If you don’t select a taxonomy, all photos will be displayed. Here’s an example of one of my lists in WP Show Posts:

WP Show Posts list properties for a photo gallery
Next you can adjust the individual settings of WP Show Posts list. Below you can see how I did it. You don’t have to duplicate what I did. Give your photo gallery your look by playing with the individual WP Show Posts settings.
I went with two columns and a gutter of 2em. I also enabled the Masonry option.

Enable Image lightbox and Image lightbox gallery.

Set the Content type to None. This will remove any text.

Removing all the meta information.

Selecting a WP Show Posts card type to make the photo galleries look nicer.

Adding the WP Show Posts photo gallery to your website
You can now copy the WP Show Posts lists shortcode and add it to any of your pages. You can take a look at my photography portfolio to see what mine looks like.